Display fields are the columns of information that will display on your report output. The Display Fields tab is the active tab by default in the Report Template Editor.
Note
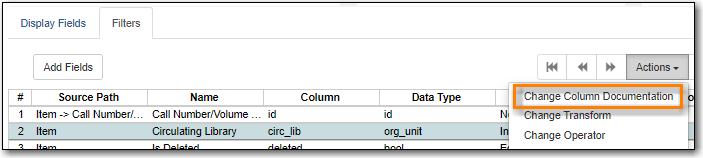
The action Change Column Documentation on the Display Fields tab can be ignored as it does not apply to display fields.
You can use the arrows on the right to move fields up and down the list. The list order top to bottom here on the Display Fields tab will determine the order of column display from left to right. Sorting is controlled separately, in the Report Layout tab.

- Repeat until your fields are in the order you desire.
Sitka Snippet Video - Report Template Editor: Renaming Display Fields (2:36)
Each dislay field in a template has a column label which displays as the column header in the report output.
On the Display Fields tab you can adjust the display name of any field by clicking in the Name box and typing in a new name. The original field name will show below the Name box along with the path you took to field the field starting at your source.

Note
It is best practice to include qualifiers in the field names for fields like barcode and library so that staff know what data they are looking at in the report output.
For example, for multi-branch libraries and libraries participating in reciprocal borrowing it is not uncommon for the Circulating Library and Owning Library of an item to be different. In this case it is important to specify in the field name which type of library is being presented in the report output data.
For information on specific transforms see the section called “Field Transforms”.
On the Display Fields you can adjust the way data will display in your output by using the Transform dropdown on each selected field. Transform options will vary depending on the fields you have selected, and in some cases will default to a specific recommended transform value (e.g., fields that total payments will default to a transform of “Sum”).

Sitka Snippet Video - Report Template Editor: Removing Display Fields (2:39)
Caution
Removing display fields usually does not affect the result set for the report output but it can, especially when the report output displays a count of records (whether item, patron, circulation, hold, or bibliographic).
When removing fields be mindful of whether or not it will still be clear in the report output what your results mean.
On the Display Fields you can remove a field by clicking the minus button on the left of this area. You can also remove a field by unchecking it from the options under the All Fields header.

When running a report the filter can include text which gives information on how to use the particular filter and in some cases how to enter the filter value. In the Report Template Editor this is referred to as column documentation or a field hint.
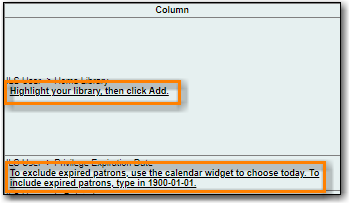
- On the Filter tab select the field you would like to add column documentation to.
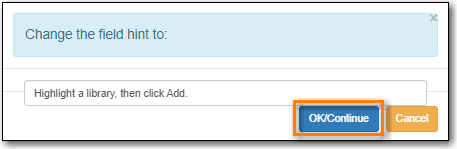
Select the Supply Hint box.
Enter the hint text in the newly displayed field.
- When running a report the hint will display above the filter path.
For information on specific transforms see the section called “Field Transforms”.
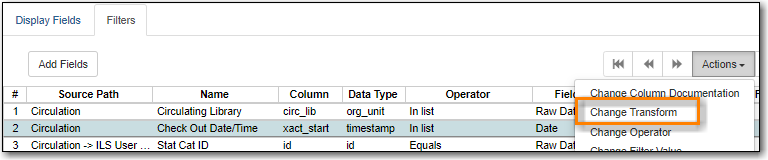
- On the Filters tab locate the field you would like to change the transform for.
Use the Transform drop-down on the field to select the transform you would like to use. The transforms available in the list will vary depending on the data type of the selected field.
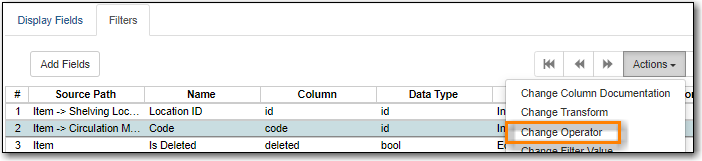
For information on specific operator see the section called “Operators”.
- On the Filter tab locate the field you would like change the operator of.
Use the Operator drop-down on the field to select the new operator from the list.
Filter values can be hardcoded into a template or left blank to be filled in when the report is run. Information on commonly hardcoded filters can be found in the section called “Report Filters”.
Hardcoding a filter is recommend when the value of the filter will not change. For example, hardcoded filters are often used when filtering out deleted items.
Filter values can also be hardcoded into templates to make it easier for staff with less reporter experience to run certain reports. For example, you can set up a report with a Item Status filter with a hardcoded value of Missing so that staff can run a report to get a list of all missing items without having to enter filter information.
Co-op Support recommends balancing the re-usabilty of templates that comes when staff enter filter values at the time of running a report versus the ease of use for staff with less experience with the reporter. For example, when no value is entered in the template for a filter on Item Status staff can pick the relevant status from the 26 statuses currently in use in Sitka’s Evergreen. When a value is hardcoded in for item status a new template must be created everytime you wish to filter on a different item status.
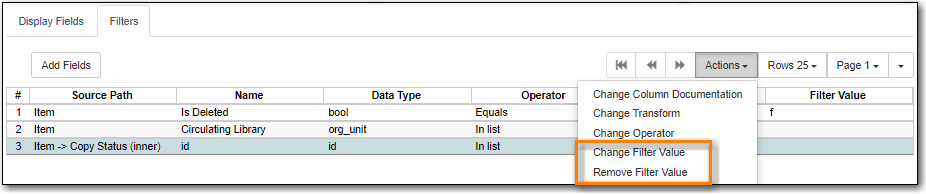
- On the Filter tab, locate the field you would like add, update, or remove the filter value for.
To add a value,
- Select the Supply Filter Value checkbox beneath the field’s Transform field. A new set of options for Filter value will be displayed under the Operator field. The particular filter mechanism will vary depending on your selected Transform and Operator. See Filter Values for details on exactly how different values must be entered.
- To edit a preexisting value, overwrite the current Filter Value with your desired value.
To remove an existing hardcoded value, deselect the Supply Filter Value checkbox. Filter values will instead need to be added at the report definition level.
Caution
Removing a filter WILL affect what results are included in your report output. Ensure you don’t need to filter on a particular field before removing it.
All report templates MUST have at least one filter to choose a specific library. This filter is important as it allows staff to comply with Sitka’s data use requirements as per Appendix J of the Service Management Agreement and restrict the data in the report output to only data relevant to their library.
- On the Filter tab select the filter field you would like to remove.
You can remove a field by clicking the minus button on the left of this area. You can also remove a field by unchecking it from the options under the All Fields header..
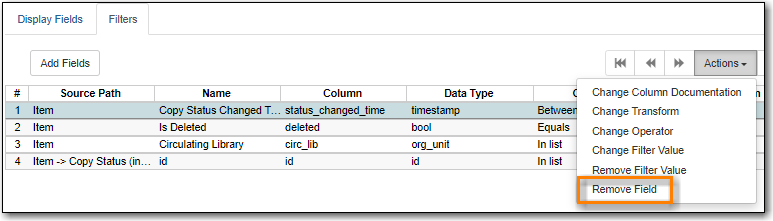
- The selected field is removed and no longer shows as a filter field.
Select the Report Layout tab to adjust the organization of the data on your final output.
- On the left side, under Field Display Order, you can rename columns, adjust transforms, and reorder your columns in this tab in the same way you can in the Field Display tab.
On the right side, under Field Sort Order, you can independently set sort orders on each column as well as determine which column should sort first, second, third, etc. The sorting is independent of the column display order.

In the example above, the first three columns to display will be Shelving Location, Owning Library, and then Circulating Library, but the report will sort first by Count of Circulations, then Checkout Month, and then by Shelving Location.
