Funds should be created for every budget you wish to track. For some libraries this may be a fund per individual collection; other libraries may only use one fund for all purchasing. Libraries may want to create funds specifically for non-bibliographic purchases, such as processing supplies, or for other charges such as charges for MARC records.
Multi-branch libraries may have a single set of funds for their entire system, a set of funds for each branch, or may use a combination of funds at the branch and system levels.
Note
Funds should be created when your library first starts using acquisitions and when you want to track a new budget. Funds for subsequent fiscal years are created automatically by Evergreen during the year end processes.
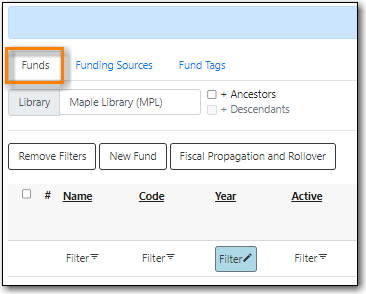
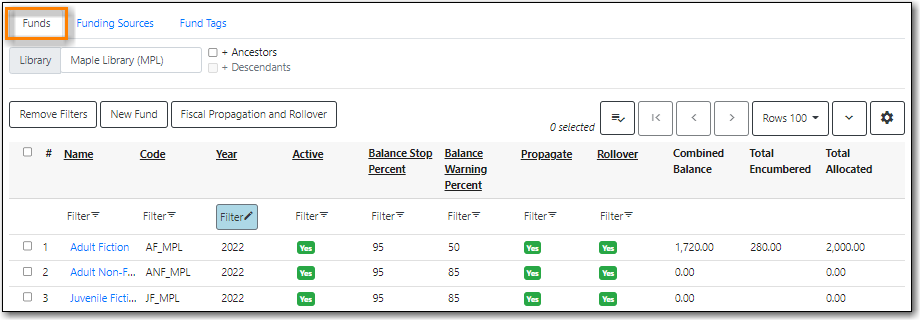
- Go to Administration → Acquisitions Administration → Fund Administration.
Select the Funds tab.
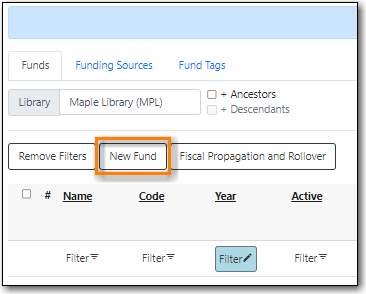
Click New Fund.
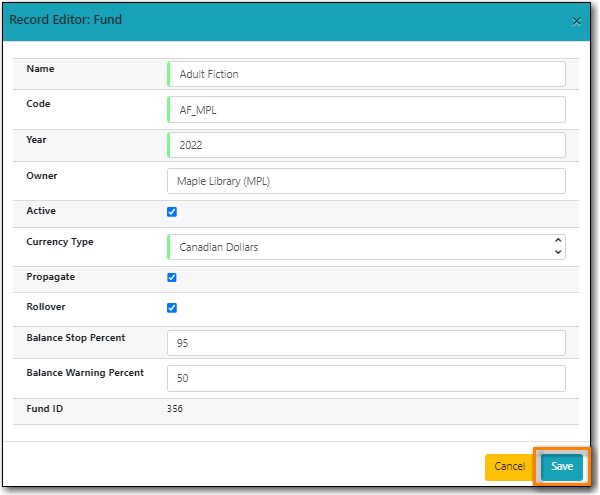
- Enter a name for the fund. There is no limit to the number of characters that can be entered in this field.
Create a unique code for the fund.
- Please add your library short code to the end of all fund codes. For example, AF_MPL
- Enter a year for the fund. This can be a fiscal year or a calendar year. The format of the year is YYYY.
The fund owner will default to your workstation.
- In a multi-branch system funds may be set to the top organizational unit, the organizational units for branches, or a combination.
- The fund will be Active by default. You cannot make purchases from an inactive fund.
- Select a currency type from the drop down menu. When a fund is applied to a line item or copy the price of the item will be encumbered in the currency associated with the fund.
- Check the propagate box if you will want to propagate this fund. When you propagate a fund, Evergreen creates a new fund for the following fiscal year with the same parameters as your current fund. All of the settings transfer except for the year and the amount of money in the fund. Propagation occurs during the fiscal year close-out operation.
- Check the Rollover box if you would like to roll over remaining funds and/or encumbrances during the fiscal year close-out operation into the same fund for the next year.
Optionally, enter a Balance Stop Percent. The balance stop percent prevents you from making purchases when only a specified amount of the fund remains. For example, if you want the fund to stop purchases after 95% of the fund has been spent, then you would enter 95 in the field. When the fund reaches its balance stop percent, it will appear in red when you apply funds to line items.
- If this field is left blank it is possible to overspend the fund.
- The balance stop percent can be adjusted as needed throughout your fiscal year.
Optionally, enter a balance warning percent. The balance warning percent gives you a warning that the fund is low. You can specify any percent. For example, if you want to be warned when 50% of the fund has been spent, then you would enter 50 in the field. When the fund reaches its balance warning percent, it will appear in yellow when you apply funds to line items.
- The Balance Warning Percent can be adjusted as needed throughout your fiscal year.
Click Save.
- Your fund will be created. Repeat this process to create additional funds.
Caution
Never edit the currency of an active in-use fund.
You also cannot edit the the balance of your fund through the Edit function. A fund’s balance must be adjusted by allocating monies to the fund or transferring monies to another fund.
- Go to Administration → Acquisitions Administration → Fund Administration.
- Select the Funds tab.
- Double-click on the row you would like to edit. A pop-up box will appear in which you can edit the fields.
Make your changes and click Save.
- Your fund will be updated.
Caution
If you load vendor records make sure you let your vendors know about any changes you make to fund codes that are used in their templates. If the fund code doesn’t match between Evergreen and the $f in the templates your MARC records will not load.
- Go to Administration → Acquisitions Administration → Fund Administration.
- Select the Funds tab.
- Check the box of the fund you wish to delete.
From the Actions menu select Delete Selected.
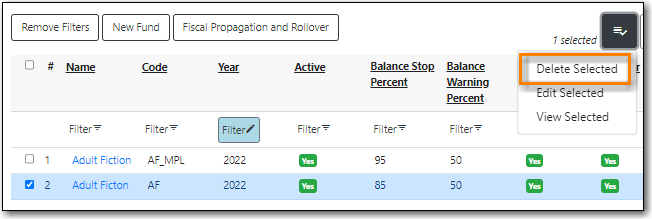
- The fund is deleted.
Note
A fund can only be deleted if no credit has been allocated to it.
Sitka Training Video - Allocate Money to Funds (2:22)
To allocate credits using the Fund Tab:
- Go to Administration → Acquisitions Administration → Fund Administration.
Select the Funds tab.
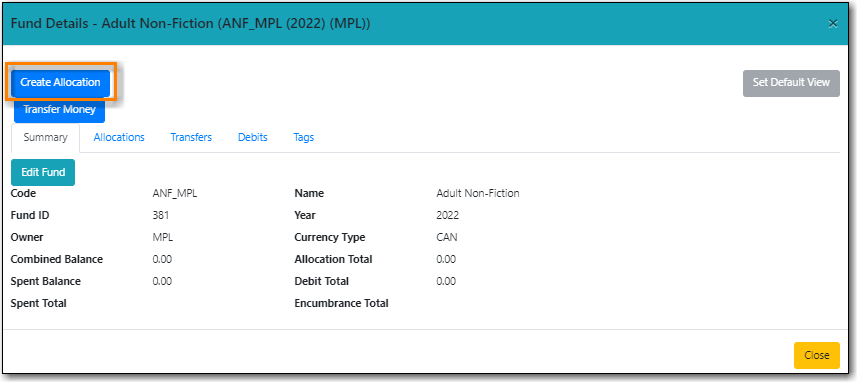
- Click the hyperlinked name of the fund. The Fund Details pop up will appear.
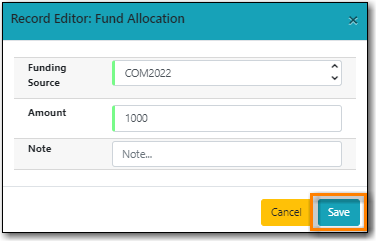
Click Create Allocation.
- Choose the Funding Source from the drop down menu.
- Enter the amount you would like to apply to the fund from the funding source.
- Enter a note. (Optional).
Click Save.
The credits that you allocate to funds can be transferred between funds if desired. The system tracks these transfers.
- Select Administration → Acquisitions Administration → Fund Administration.
Select the Funds tab.
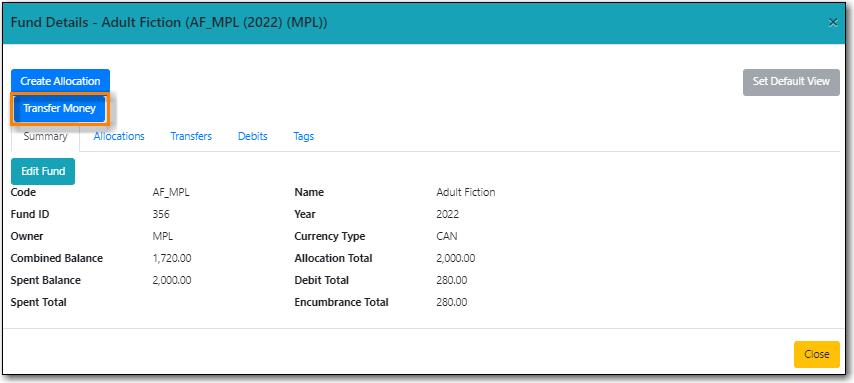
- Click the hyper linked name of the fund. The Fund Details pop up will appear.
Click Transfer Money.
- Enter the amount you would like to transfer.
- From the drop down menu, select the code of the destination fund.
- Enter a note. (Optional).
Click Transfer.
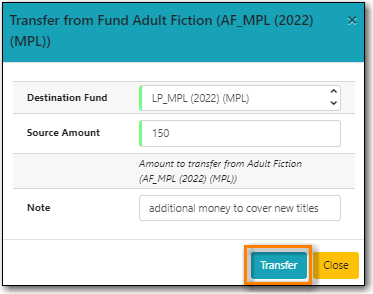
- The money is transferred and the allocation balances of the funds are updated.
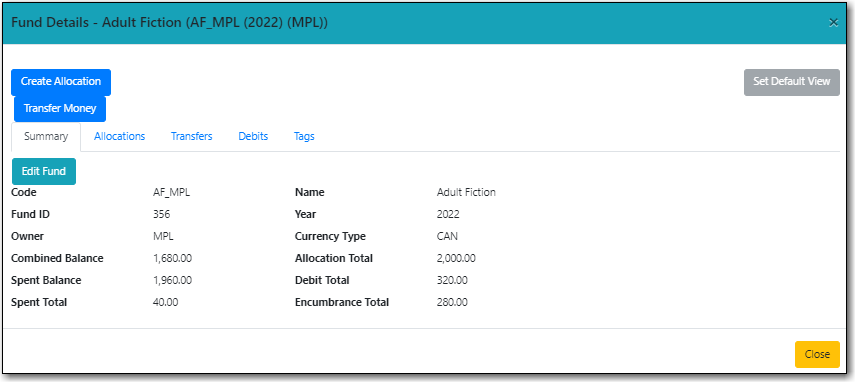
The Fund Details screen allows you to track a fund’s balance, encumbrances, and amount spent.
- Select Administration → Acquisitions Administration → Fund Administration.
Select the Funds tab.
Click the hyper linked name of the fund. The Fund Details screen will appear.
Summary - The summary tab allows you to track the following:
- Combined Balance - The balance is calculated by subtracting both spent and encumbered funds from the total allocated to the fund.
- Spent Balance - This balance is calculated by subtracting only the funds that been invoiced, and so spent, from the total allocated to the fund. It does not included encumbrances.
- Spent Total - The total spent is calculated by adding the cost of all items that have been invoiced. It does not include encumbrances.
- Allocated Total - This amount is the total monies allocated from the Funding Source(s).
- Debit Total - The total debits are calculated by adding together the total spent and total encumbered.
- Encumbrance Total - The total encumbered is calculated by adding all the encumbrances. It does not include items that have been invoiced.
- Allocations - The Allocations tab allows you to track credit allocated from funding sources, transfers to other funds, and transfers from other funds.
- Transfers - The Transfers tab allows you to track money that is transfered between funds.
- Debits - The Debits tab allows you to track all purchases made and monies encumbered against the fund.
Tags - The Tags tab allows you to add and delete fund tags. See the section called “Fund Tags”.