Items can have their status changed via the Mark functions on the Actions menus.
Note
There is variation between interfaces with what specific wording is used for some of these actions. The most commonly used wording is used in the instructions here.
See the section called “Item Statuses” for more information on how particular item statuses behave.
If a patron believes an item was erroneously checked out on their account and staff cannot locate it to check it in the item can be marked as claims never checked out.
- Go to the Items Out tab in the patron account.
Select the item and choose Mark Claims Never Checked Out from the Actions menu.
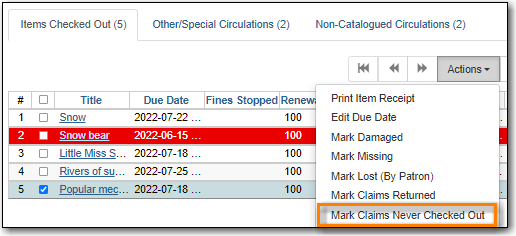
- A pop-up appears where staff can confirm that they wish to mark the item by clicking OK/Continue.
- The item is checked in and set to Missing. The item is no longer associated with the patron’s account.
- The patron’s Claims Never Checked Out Count is automatically increased. This can be viewed in the patron summary and the Edit tab.
Note
Libraries may wish to routinely run reports on items with the status of Missing so they can be searched for and replaced/deleted as appropriate.
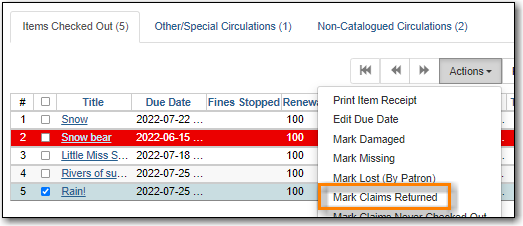
If a patron believes an item out on their account was returned and staff cannot locate it to check it in the item can be marked as claims returned.
- Go to the Items Out tab in the patron account.
Select the item and choose Mark Claims Returned from the Actions menu.
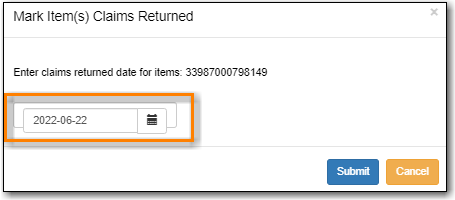
Enter the date on which the patron claims they returned the item and click Submit. If the chosen date is in the past any overdue fines will be adjusted accordingly.
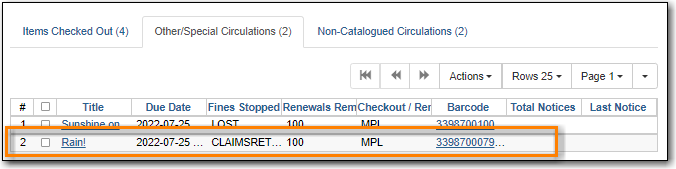
The item’s status is updated to Claimed Returned. It remains associated with the patron’s account and is now displayed on the Other/Special Circulations tab.
The patron’s Claims-returned Count is automatically increased. This can be viewed in the patron summary and the Edit tab.
Note
Some libraries prefer to use the status Missing rather than Claimed Returned. This can be set using the library setting Claim Return: Mark copy as missing.
Libraries can use the library setting Max Patron Claims Returned Count to set a maximum number of items a patron can claim as returned before a staff override is required.
A claimed returned items is resolved when it is checked in or when the status is updated to Missing or Lost following local library policy. An alert displays on check in to let staff know a claimed returned item has been found. If the item is found in the library staff may wish to adjust the patron’s Claims-returned Count accordingly on the Edit tab.
If a patron damages an item or it is found damaged in the library it can be marked as damaged at check in, from within a patron’s account, from the Holds Pull List, from the Holds Shelf, or via the Item Status interface.
On the appropriate interface select the item and choose Mark Items Damaged from the Actions menu.
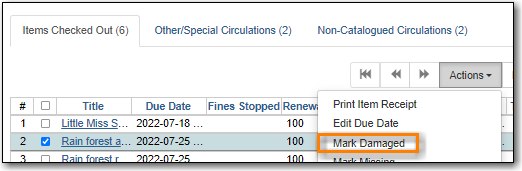
- A pop-up appears indicating that the item will be marked damaged. Click Submit.
If your library has the library setting Charge item price when marked damaged set to True a second pop-up will appear.
- If needed, adjust the amount being billed. The processing fee from the library setting Charge processing fee for damaged items is included in the total.
- Select the bill type from the drop down menu.
- If needed, add a note.
- If you are not charging the patron in this particular case, click No Charge.
Click Submit.
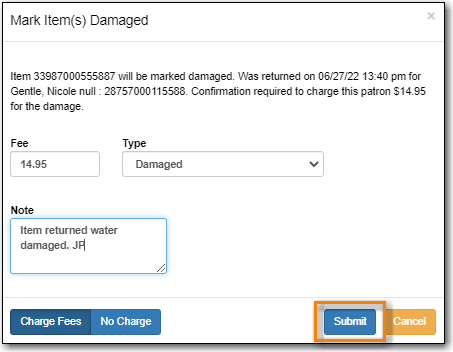
- The item’s status is updated to Damaged and removed from the patron’s account. If the patron has been billed for the damage the bill will display in the Bills tab. The bill displays as a single charge which includes the processing fee.
A damaged item is resolved when it is checked in to return it to circulation, when the status is updated to Discard/Weed, or when the item is deleted. An alert displays on check in to let staff know a damaged item has been checked in.
Note
Checking in a damaged item does not affect any bills that were generated when the item was set to Damaged.
If an item is slated to be removed from the collection it can be marked as discard/weed at check in, from the Holds Pull List, from the Holds Shelf, or via the Item Status interface. Libraries may wish to use the Discard/Weed status when items to be discarded need to be reviewed before being deleted.
On the appropriate interface select the item and choose Mark Item Discard/Weed from the Actions menu.

- A pop-up appears where staff can confirm that they wish to mark the item by clicking OK/Continue.
- The item is set to Discard/Weed.
A discarded item is resolved when it is checked in to return it to circulation or deleted from Evergreen.
Note
Staff may wish to put discarded items into item buckets to make it easier for subsequent staff to view and work with the items. See Chapter 23, Item Buckets for information on using item buckets.
If an item cannot be located, it can be marked as missing from the Holds Shelf, from the Holds Pull List, or via the Item Status interface.
On the appropriate interface select the item and choose Mark Item Missing from the Actions menu.
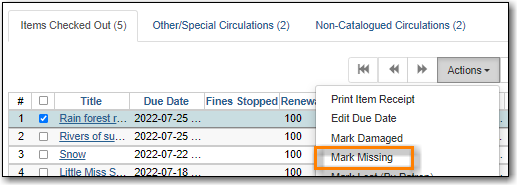
- A pop-up appears where staff can confirm that they wish to mark the item by clicking OK/Continue.
- The item is set to Missing.
A missing item is resolved when it is found and checked in or when it is deleted from Evergreen.
If an item is returned with pieces missing it can be marked as missing pieces from Check In or the Scan Item as Missing Pieces interface. The feature currently functions slightly different depending on which interface it is accessed through.
- Go to Circulation → Check In.
- Check the item in.
Select the item and click Actions → Mark Missing Pieces.
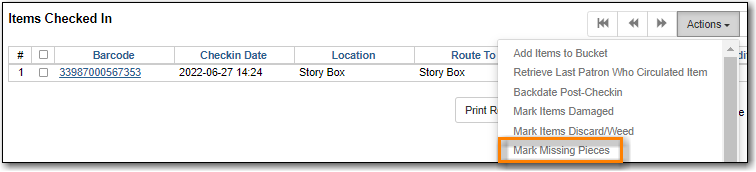
- A pop-up appears where staff can confirm that they wish to mark the item by clicking OK/Continue.
- A print dialog will appear. Staff can print the slip to keep with the item.
- The Create Note pop-up will appear. Use the pop-up to create a note, alert, or block on the patron’s account. This note can be set as patron visible so it displays to the patron in My Account.
- Click OK.
The note is applied to the last borrower’s account and the item is set to Damaged and checked back out to the patron’s account.
Note
This method of setting an item as missing pieces is missing the letter that is generated at the end of the process. If that letter is important to your workflow you should always mark items missing pieces via the Scan Item as Missing Pieces interface.
- Go to Circulation → Scan Item as Missing Pieces.
- Scan the item’s barcode.
Click Mark Item as Missing Pieces?.
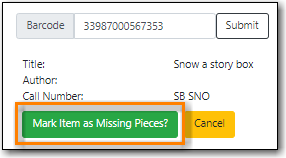
- A print dialog will appear. Staff can print the slip to keep with the item.
- The Create Note pop-up will appear. Use the pop-up to create a note, alert, or block on the patron’s account.
- Click Save.
- The note is applied to the last borrower’s account and the item is set to Damaged and renewed on the patron’s account, if there are remaining renewals.
A letter is generated that can be edited and then printed and mailed to the patron.
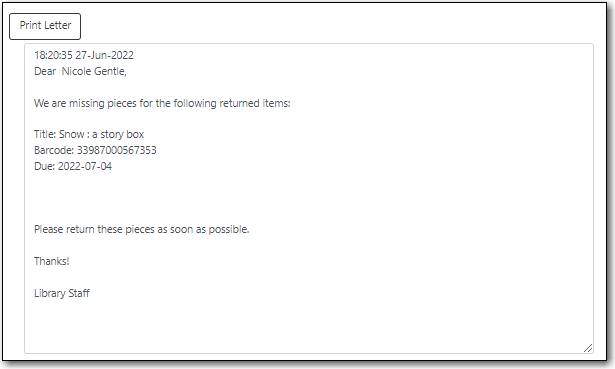
A missing pieces item is resolved when the pieces are returned and the item is checked in or the pieces are never returned and the item is deleted. Notes, alerts, and blocks related to the item must be manually removed from the patron’s account.
Note
Libraries can choose to use a different item status for missing pieces instead of Damaged. The library setting Item Status for Missing Pieces is used to set this.
If a patron loses an item, it can be marked as lost in their account.
- Go to the Items Out tab in the patron account.
Select the item and choose Mark Lost (By Patron) from the Actions menu.
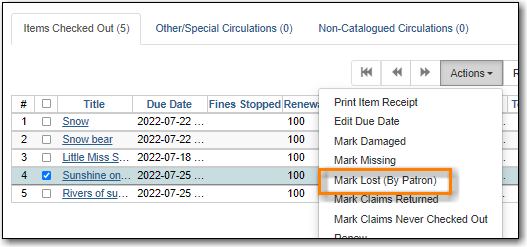
The item’s status is updated to Lost. It remains associated with the patron’s account and is now displayed on the Other/Special Circulations tab.
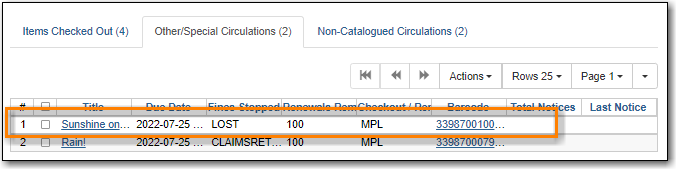
A bill is automatically added to the patron’s account on the Bills tab for the replacement cost of the item and displays highlighted in pink. A processing fee is included if the library has a value in the library setting Lost Materials Processing Fee.

Tip
Evergreen can also automatically mark an item as lost after the item is a set number of days overdue. See the section called “Overdue Mark Lost Notification” for information on this process.
A lost item is resolved when it is checked in or paid for. A checked in lost item will continue to display on a patron’s Other/Special Circulations tab until all bills linked to the item are resolved. This includes replacement charges, overdue charges, and manual charges added to the existing bills. See Chapter 10, Bills and Payments for more information on managing bills for lost items.

